On this page
From the command line
to robust and interpretable
calibrated predictions.
A hands-on tutorial for the reexpress_sdm Python package.
The following sections are meant to be pasted into the terminal, rather than executed as a single script. (The shell-formatted tutorial, getting_started_tutorial_source.sh, is saved in this directory and has the core content if you would prefer to follow along in a text editor.)
This provides a tutorial for the command line interface (CLI), which exposes the core behavior of the package. For additional flexibility, use the Python API. Even if you plan to use the latter, this tutorial can be informative to step through to get an overview of the key behavior.
SDM Estimators unlock Actionable Interpretability for neural networks
reexpress_sdmprovides point predictions and calibrated estimates of the predictive uncertainty for small |Y| classification tasks (typically 2-5 classes). The input is cached vectors (typically derived from the hidden-states of a neural language model).- Before a test prediction can be made, the model must be trained and calibrated. The code trains and calibrates a small neural network (specifically, a Similarity-Distance-Magnitude activation) over the input vectors for the given classification task with user-provided labeled data. Once trained and calibrated, that model can then be used for predicting over new, unseen test instances. Training and testing involve L^2 nearest-neighbor matching.
- In the per-instance output at test-time, the field "prediction" provides the point prediction and "centroidRegionAlpha" provides a conservative estimate into which class- and prediction-conditional region of the held-out calibration set the prediction falls. A "centroidRegionAlpha" value of 0.95, for example, is an estimate that the datapoint falls into a region of the distribution for which the class- and prediction-conditional accuracy is at least 0.95. A value of 0.0 indicates no region was assigned; such points should be treated as out-of-distribution to the estimator.
- The "centroidRegionAlpha" estimate corresponds to the nested HR regions defined in "Similarity-Distance-Magnitude Activations" (published in ACL Findings 2026) and "Research Note: Nested Similarity-Distance-Magnitude Estimators".
- This is a more stringent calibration criterion than a prediction-conditional estimate. It is an easy-to-understand quantity useful for typical applications involving conditional-branching decisions with language models.
- Typical use-cases:
- Calibrating "LLM-as-a-Judge", including an ensemble of such models
- Estimating uncertainty over retrieval and tool-calls
- Building continual-learning and memory-based systems
- More generally, reexpress_sdm unlocks Actionable Interpretability for neural network systems, since the metric-learning, geometry-aware uncertainty estimates have a direct instance-wise mapping to the training/calibration data, enabling uncertainty-aware interpretability-by-exemplar.
The example task: Fact checking
This demo examines the Factcheck data from the following work:
Amos Azaria and Tom Mitchell. 2023. The internal state of an LLM knows when it's lying. In Findings of the Association for Computational Linguistics: EMNLP 2023, pages 967–976, Singapore. Association for Computational Linguistics.
as previously examined with SDM estimators in:
Allen Schmaltz. 2026. Similarity-Distance-Magnitude Activations. In Findings of the Association for Computational Linguistics: ACL 2026, pages 22037–22057, San Diego, California, United States. Association for Computational Linguistics.
In this case, for illustrative purposes, the embeddings are from a more recent model, the publicly available mlx-community/gemma-4-31b-it-4bit model. The embeddings are available here factcheck_gemma_4_31b_it_4bit.zip. The embeddings are constructed from the final-layer hidden states, concatenating the following:
max-pool over the sequence :: mean-pool over the sequence :: hidden-state of the final token (that estimates Yes | No)
As such, the embeddings contain 3 x 5376 = 16128 dimensions.
The script at factcheck_gemma4_31b_mlx.sh shows how these embeddings were extracted.
(The publicly available .jsonl data files in the SDM Activations research repo can also be used as drop-in replacements for the factcheck_gemma_4_31b_it_4bit data if you want to walk through this tutorial with other models or tasks, such as sentiment classification.)
Install the Python package
First, create a local environment, such as with conda (Anaconda, Miniconda, or Miniforge: conda documentation), or related virtual environments:
conda create -n re_python_v1 python=3.12after completing the tutorial, the environment can be removed:
# conda env remove -n re_python_v1Next, activate the environment:
conda activate re_python_v1Install the package:
python -m pip install reexpress-sdmAlternatively, you can create an editable install from source in the standard way:
# cd reexpress_sdm # path to the GitHub repo
# python -m pip install -e .Pasting comments in zsh
As a side note, zsh (the default shell on macOS), unlike Bash, doesn't recognize # comments when you type them interactively, so pasting a line like # some comment into the terminal will print an error. You can enable such comments by adding setopt interactivecomments to your ~/.zshrc and opening a new terminal (or running source ~/.zshrc).
Download the example data
Choose a ${PROJECT_DIR} on your local drive and then download the data. ${PROJECT_DIR} will be used to store the data, models, and output for this tutorial.
PROJECT_DIR="/Users/a/Documents/project_tutorials"  # choose a suitable directory; we will be using this below to organize the output

mkdir -p ${PROJECT_DIR}/data

cd ${PROJECT_DIR}/data

curl -L -O https://github.com/ReexpressAI/Reexpress_two/releases/download/v0.1.0-data/factcheck_gemma_4_31b_it_4bit.zip
And then unzip:
unzip factcheck_gemma_4_31b_it_4bit.zipThis will take about 1.3 GB of storage (plus about 500 MB for the original .zip file).
This binary classification task is to predict whether a given short statement is true (class 1) or false (class 0).
Train and calibrate a model
sdm train learns the parameters of the SDM activation (the final-layer adaptor) AND runs the calibration algorithm to partition the calibration set. Once sdm train completes, the model is ready to be used to predict over new, unseen data.
Here, we train for 2 iterations of 500 epochs each. For the purposes of the tutorial, feel free to reduce the number of iterations or epochs for faster training.
As a back-of-the-envelope guide, each epoch on an M2 Ultra 76 core Mac Studio takes about 0.5 seconds, and around 8 minutes for the full run.
For a production setting, we would train with additional iterations and epochs (and ideally, a larger dataset).
Interestingly, an advantageous property of the SDM estimator is that such calibration is relatively robust to under-trained, or otherwise poorly optimized, models. (The estimator will tend to be conservative in those cases. Training the adaptor using the standard cross-entropy loss, which is equivalent to the SDM loss with the instance-wise regularization terms set at a constant q=e-2 and d=1, will also tend to not "break" calibration, but the estimator will tend to be more conservative than when training with the SDM loss.)
Such variations are easy to examine here and with the macOS app Reexpress two. Your exact results below may differ from ours depending on the options you choose.
As with other commands, use sdm train --help to see the available arguments (and defaults).
Note that --composition determines what fields in the JSON lines files will be used as input to the SDM activation. For convenience, we separate "embedding" and "attributes" if, for bookkeeping, you want to separate the core embeddings from other features, but you are free to choose the semantics of those fields, or to altogether ignore that distinction and only use the "embedding" field, or only the "attributes" field.
If you choose "embedding+attributes", both vectors are concatenated together as input to the SDM activation. The important point is to be consistent for a given model and subsequent evaluation/deployment.
FYI: If specified at training, the same values for --representation_fingerprint and --class_names must be used at test time, including when importing into Reexpress two.
First, create the output directories, and for readability, set local environment variables with the file/directory paths:
conda activate re_python_v1

PROJECT_DIR="/Users/a/Documents/project_tutorials"  # Update with the applicable path

DATA_DIR="${PROJECT_DIR}/data/factcheck_gemma_4_31b_it_4bit"

TASK_LABEL="factcheck"
MODEL_LABEL="gemma_4_31b_it_4bit"
TRAIN_FILE="${DATA_DIR}/train.${MODEL_LABEL}.jsonl"
CALIBRATION_FILE="${DATA_DIR}/calibration.${MODEL_LABEL}.jsonl"

MODEL_DIR="${PROJECT_DIR}/models/${TASK_LABEL}.${MODEL_LABEL}"
mkdir -p "${MODEL_DIR}"

MODEL_FILE=${MODEL_DIR}/${TASK_LABEL}.${MODEL_LABEL}.sdmkitmodel

ALPHA_RESOLUTION=0.01
EXEMPLAR_DIMENSION=1000
LEARNING_RATE=0.000001

echo ${MODEL_DIR}/logs.txt # training output is redirected to logs.txt; use `tail -f ${MODEL_DIR}/logs.txt` to watch progress/Users/a/Documents/project_tutorials/models/factcheck.gemma_4_31b_it_4bit/logs.txtNext, kick-off training. The calibration step will run automatically once the weights of the SDM activation are learned. sdm train auto-selects the device (CUDA, then MPS, then CPU); add --device=cpu|mps|cuda to choose explicitly.
sdm train \
--training=${TRAIN_FILE} \
--calibration=${CALIBRATION_FILE} \
--number_of_classes 2 \
--representation_fingerprint embedding_v1 \
--output ${MODEL_FILE} \
--alpha_resolution=${ALPHA_RESOLUTION} \
--epochs 500 \
--number_of_random_shuffles=2 \
--batch_size 64 \
--learning_rate ${LEARNING_RATE} \
--max_neighbors 2048 \
--exemplar_dimension ${EXEMPLAR_DIMENSION} \
--composition="embedding" \
--report_output=${MODEL_DIR}/report.txt > ${MODEL_DIR}/logs.txt 2>&1

echo ${MODEL_DIR}/report.txt # summary report of training/Users/a/Documents/project_tutorials/models/factcheck.gemma_4_31b_it_4bit/report.txtsdm artifact validate checks the model file is well-formed:
sdm artifact validate --model ${MODEL_FILE}sdm artifact inspect provides summary stats, including the q'_min values and thresholds for each calibration region for which the class- and prediction-conditional accuracy is estimated to be at least a given alpha:
sdm artifact inspect --model ${MODEL_FILE}In this case, the most conservative region into which the calibration set was able to be partitioned was alpha=0.97, followed by alpha 0.89 and 16 additional descending regions down to 0.52.
Evaluate and score the test sets
The following will score the two held-out evaluation files: The file with the prefix "ood_eval" is a covariate-shifted test set, and the file with the prefix "ood_eval.ood_random_shuffle" is that same file but with the input randomly shuffled to create an out-of-distribution test set.
sdm evaluate generates an overall summary of the predictions and calibration given ground-truth labels (as we have here). The output is a JSON object.
sdm score generates per-document predictions with calibrated estimates of the predictive uncertainty, along with the constituent signals that were used to construct those uncertainty-estimates. By default, the nearest 25 documents in the support (training) set are also provided for interpretability-by-exemplar. The output is a JSON lines (.jsonl) with one output object per document.
In the following, for illustrative purposes we run both sdm evaluate and sdm score, but they are not dependent on each other and can be run independently, as needed.
conda activate re_python_v1

PROJECT_DIR="/Users/a/Documents/project_tutorials"  # Update with the applicable path

DATA_DIR="${PROJECT_DIR}/data/factcheck_gemma_4_31b_it_4bit"

TASK_LABEL="factcheck"
MODEL_LABEL="gemma_4_31b_it_4bit"
TRAIN_FILE="${DATA_DIR}/train.${MODEL_LABEL}.jsonl"
CALIBRATION_FILE="${DATA_DIR}/calibration.${MODEL_LABEL}.jsonl"

MODEL_DIR="${PROJECT_DIR}/models/${TASK_LABEL}.${MODEL_LABEL}"
mkdir -p "${MODEL_DIR}"

MODEL_FILE=${MODEL_DIR}/${TASK_LABEL}.${MODEL_LABEL}.sdmkitmodel

ALPHA_RESOLUTION=0.01
EXEMPLAR_DIMENSION=1000
LEARNING_RATE=0.000001

EVAL_OUTPUT_DIR=${MODEL_DIR}/eval_output

mkdir -p ${EVAL_OUTPUT_DIR}

for EVAL_LABEL in "ood_eval" "ood_eval.ood_random_shuffle"; do

EVAL_FILE="${DATA_DIR}/${EVAL_LABEL}.${MODEL_LABEL}.jsonl"

echo "Processing ${EVAL_FILE}"

sdm evaluate \
--model=${MODEL_FILE} \
--input=${EVAL_FILE} \
--output ${EVAL_OUTPUT_DIR}/${EVAL_LABEL}.${MODEL_LABEL}.overall_evaluation_report.json

echo "Evaluation report at ${EVAL_OUTPUT_DIR}/${EVAL_LABEL}.${MODEL_LABEL}.overall_evaluation_report.json"

sdm score \
--model=${MODEL_FILE} \
--input=${EVAL_FILE} \
--composition="embedding" \
--output ${EVAL_OUTPUT_DIR}/${EVAL_LABEL}.${MODEL_LABEL}.per_document_scores.jsonl

echo "Per-document scores saved to ${EVAL_OUTPUT_DIR}/${EVAL_LABEL}.${MODEL_LABEL}.per_document_scores.jsonl"

done
Interpreting the output of sdm score: The JSON object for each document contains the values that were used to construct the calibration estimate. As noted above, by default, the 25 nearest matches in the support set are also returned. This enables interpretability of the estimate when further analysis is needed.
For typical applications, as a first pass, in addition to "prediction", which indicates the predicted class, the key piece of information to focus on is the "centroidRegionAlpha" value. This is an estimate that the datapoint falls into a region of the distribution for which the class- and prediction-conditional accuracy is at least that value (e.g., 0.99 or 0.52).
When that value is 0.0, it means no region could be assigned, and the point should be treated as being out-of-distribution for the estimator.
Reviewing the output of sdm evaluate, we see the marginal accuracy of the 0.97 region is 0.974 (38 out of 39 documents) for the documents in the "ood_eval" file. (After the CLI tutorial, we will examine that 1 missed prediction in the alpha=0.97 region with the Reexpress two app.)
The overall marginal accuracy (i.e., the accuracy averaged over the full dataset, not just a particular region) is much lower at 0.83, which without the SDM estimator, would come as a surprise to users, since the marginal accuracy of the calibration set was 0.946 (as shown in best_calibration_scored.overall_evaluation_report.json, the score report for the calibration set, generated below).
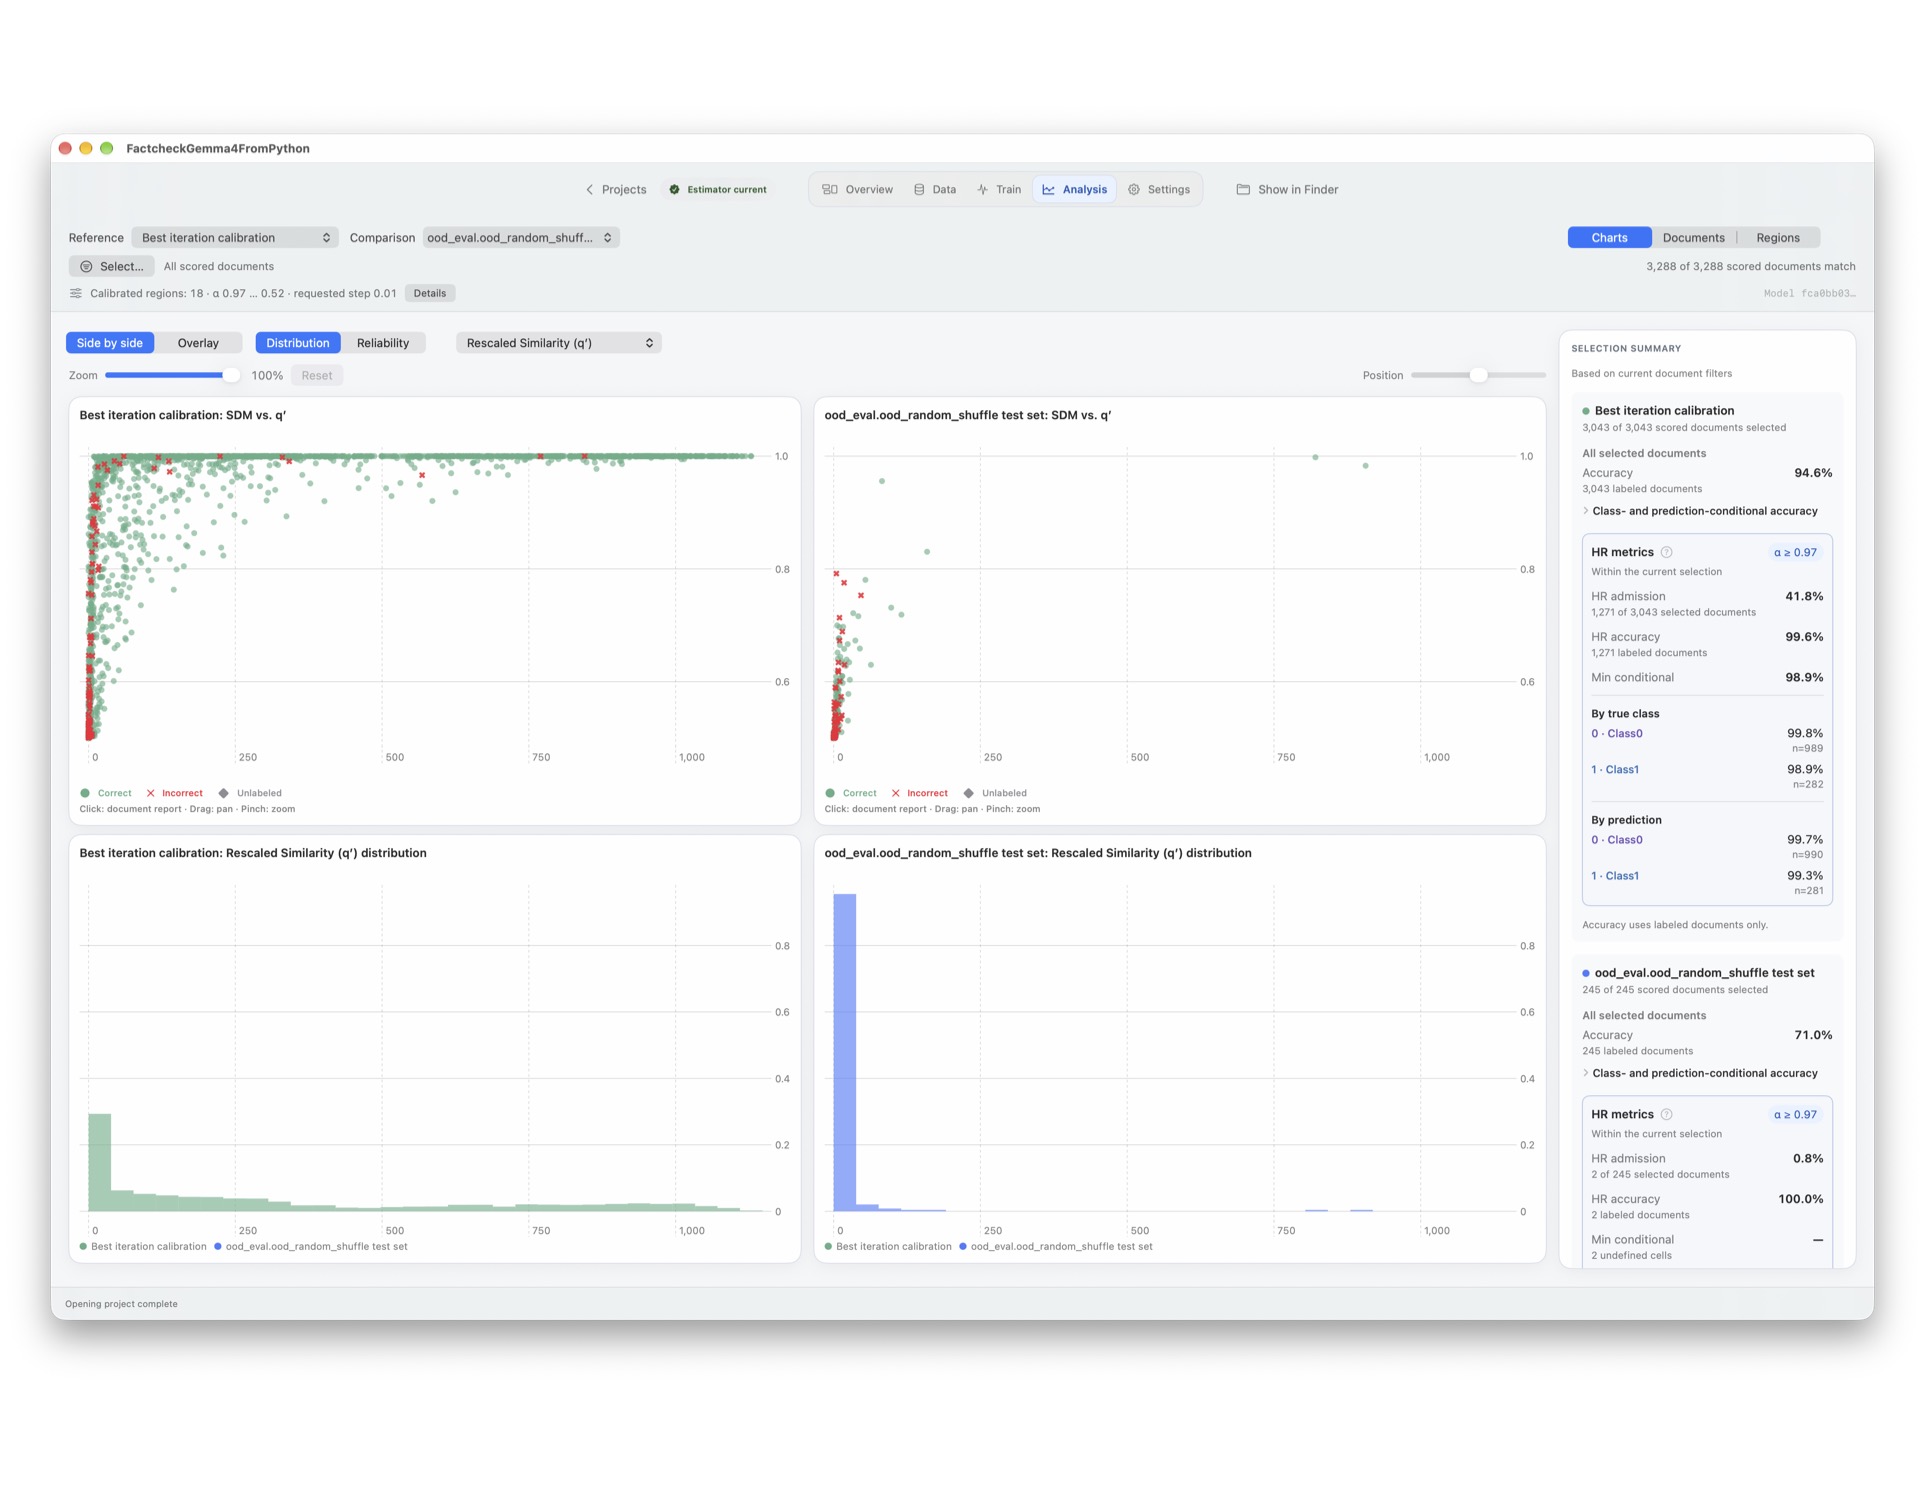
With the "ood_eval.ood_random_shuffle" file, the overall marginal accuracy falls to 0.71, but the accuracy of the 0.97 region is 1.0. In this case, only 2 points are in that region, reflecting that the distribution is relatively unlike that of the calibration set.
In other words, despite the substantial distribution shift, the SDM estimator has achieved the desired conservative notion of calibration (class- and prediction-conditional accuracy at least the given value) by correctly assigning correspondingly lower probabilities to datapoints that are unlike those seen in training and calibration.
Recalibrate at a new resolution
Without retraining the full model, we can also examine rerunning the calibration algorithm at a different resolution. (In Reexpress two, this can be achieved by going to the Train tab and the section "Recalibrate the fixed adaptor". In Reexpress two, you can also preview such changes without overwriting the model if you click "Preview ladder".)
conda activate re_python_v1

PROJECT_DIR="/Users/a/Documents/project_tutorials"  # Update with the applicable path

DATA_DIR="${PROJECT_DIR}/data/factcheck_gemma_4_31b_it_4bit"

TASK_LABEL="factcheck"
MODEL_LABEL="gemma_4_31b_it_4bit"
TRAIN_FILE="${DATA_DIR}/train.${MODEL_LABEL}.jsonl"
CALIBRATION_FILE="${DATA_DIR}/calibration.${MODEL_LABEL}.jsonl"

MODEL_DIR="${PROJECT_DIR}/models/${TASK_LABEL}.${MODEL_LABEL}"
mkdir -p "${MODEL_DIR}"

MODEL_FILE=${MODEL_DIR}/${TASK_LABEL}.${MODEL_LABEL}.sdmkitmodel

NEW_ALPHA_RESOLUTION=0.05

RECALIBRATED_MODEL_FILE=${MODEL_DIR}/${TASK_LABEL}.${MODEL_LABEL}.recalibrated_at_${NEW_ALPHA_RESOLUTION}.sdmkitmodel
Note that we need to specify a new model path (or choose --overwrite).
sdm recalibrate \
--model=${MODEL_FILE} \
--output ${RECALIBRATED_MODEL_FILE} \
--alpha_resolution=${NEW_ALPHA_RESOLUTION} \
--report_output=${MODEL_DIR}/report.recalibrated_at_${NEW_ALPHA_RESOLUTION}.txt

sdm artifact inspect --model ${RECALIBRATED_MODEL_FILE}
In this case 7 regions are found: 0.95, 0.85, 0.8, 0.75, 0.65, 0.6, 0.55. Evaluation then needs to be rerun with this updated model (as described in the previous section), but substituting this new ${RECALIBRATED_MODEL_FILE} in place of the original ${MODEL_FILE}.
(The remaining sections use the original ${MODEL_FILE}.)
Continue training from existing weights
IIt is also easy to continue training from an existing model by supplying the --initial_model argument to sdm train with the path to that existing model. Training will then use those weights for initialization. The training and calibration data need not be the same as when initially training, but the exemplar dimension, class order, input feature dimension, and representation fingerprint must stay fixed. Note that by default the data will continue to be randomly shuffled at the beginning of each training iteration (which is generally what you want), unless you choose --do_not_shuffle_data. (Such continued training is also possible in Reexpress two by going to the Train tab and choosing "Start from: Active model weights" instead of the default "Start from: Fresh weights".)
As a toy example here, we continue training for 2 iterations and 5 epochs with the same training and calibration data. In practice, one would use additional iterations and epochs.
Aside: In our earlier research code we had an option to directly add instances to the support set without retraining or recalibrating. (In this setting, directly modifying the support set can alter the calibrated probability while holding the argmax predictions unchanged.)
In this production code, training is sufficiently fast (and to avoid the complication of estimating bounds on calibration drift) that we instead require retraining (or continued training) when any changes are made to the training or calibration sets. (When changes are made to the training set, the top navigation bar in Reexpress two visually indicates that the estimator has become stale and needs to be trained.)
As noted above, sdm train learns the parameters of the SDM activation (the final-layer adaptor) AND runs the calibration algorithm to partition the calibration set. That is also true when continuing training.
conda activate re_python_v1

PROJECT_DIR="/Users/a/Documents/project_tutorials"  # Update with the applicable path

DATA_DIR="${PROJECT_DIR}/data/factcheck_gemma_4_31b_it_4bit"

TASK_LABEL="factcheck"
MODEL_LABEL="gemma_4_31b_it_4bit"
TRAIN_FILE="${DATA_DIR}/train.${MODEL_LABEL}.jsonl"
CALIBRATION_FILE="${DATA_DIR}/calibration.${MODEL_LABEL}.jsonl"

MODEL_DIR="${PROJECT_DIR}/models/${TASK_LABEL}.${MODEL_LABEL}"
mkdir -p "${MODEL_DIR}"

MODEL_FILE=${MODEL_DIR}/${TASK_LABEL}.${MODEL_LABEL}.sdmkitmodel

ALPHA_RESOLUTION=0.01
EXEMPLAR_DIMENSION=1000
LEARNING_RATE=0.000001

CONTINUED_TRAINING_MODEL_FILE=${MODEL_DIR}/${TASK_LABEL}.${MODEL_LABEL}.continued_training_example.sdmkitmodel

sdm train \
--initial_model=${MODEL_FILE} \
--training=${TRAIN_FILE} \
--calibration=${CALIBRATION_FILE} \
--number_of_classes 2 \
--representation_fingerprint embedding_v1 \
--output ${CONTINUED_TRAINING_MODEL_FILE} \
--alpha_resolution=${ALPHA_RESOLUTION} \
--epochs 5 \
--number_of_random_shuffles=2 \
--batch_size 64 \
--learning_rate ${LEARNING_RATE} \
--max_neighbors 2048 \
--exemplar_dimension ${EXEMPLAR_DIMENSION} \
--composition="embedding" \
--report_output=${MODEL_DIR}/continued_training_example.report.txt > ${MODEL_DIR}/continued_training_example.logs.txt 2>&1
(The remaining sections use the original ${MODEL_FILE}.)
Score the best iteration splits
One subtlety to training is that by default training involves randomly shuffling the training and calibration sets, so you can't just naively run sdm evaluate or sdm score on the original training and calibration sets. Instead, we need to take into account the split into which each document landed, so that we do not match a training instance to itself if it landed in the support set, and more generally to get a representative evaluation of the training instances vs. the held-out calibration instances. The sdm dataset export-sources command can be used to produce such scores by using --with_scores. Here, we also see introduce the .sdmdataset format, which is a data format that can be used instead of JSONL throughout the pipeline above, as well as with Reexpress two.
conda activate re_python_v1

PROJECT_DIR="/Users/a/Documents/project_tutorials"  # Update with the applicable path

DATA_DIR="${PROJECT_DIR}/data/factcheck_gemma_4_31b_it_4bit"

TASK_LABEL="factcheck"
MODEL_LABEL="gemma_4_31b_it_4bit"
TRAIN_FILE="${DATA_DIR}/train.${MODEL_LABEL}.jsonl"
CALIBRATION_FILE="${DATA_DIR}/calibration.${MODEL_LABEL}.jsonl"

MODEL_DIR="${PROJECT_DIR}/models/${TASK_LABEL}.${MODEL_LABEL}"
mkdir -p "${MODEL_DIR}"

MODEL_FILE=${MODEL_DIR}/${TASK_LABEL}.${MODEL_LABEL}.sdmkitmodel

ALPHA_RESOLUTION=0.01
EXEMPLAR_DIMENSION=1000
LEARNING_RATE=0.000001

EVAL_OUTPUT_DIR=${MODEL_DIR}/eval_output

mkdir -p ${EVAL_OUTPUT_DIR}
Supply both the original training and calibration files. The key parameter is the --role.
Here, role is "selected-training", which will use the indexes saved in the model file to correctly exclude self matches.
sdm dataset export-sources \
--model=${MODEL_FILE} \
--training=${TRAIN_FILE} \
--calibration=${CALIBRATION_FILE} \
--role="selected-training" \
--with_scores \
--output=${EVAL_OUTPUT_DIR}/best_training_scored.sdmdataset
In this case, role is "selected-calibration", which ensures that only the calibration set instances of the chosen model training iteration/epoch are scored.
sdm dataset export-sources \
--model=${MODEL_FILE} \
--training=${TRAIN_FILE} \
--calibration=${CALIBRATION_FILE} \
--role="selected-calibration" \
--with_scores \
--output=${EVAL_OUTPUT_DIR}/best_calibration_scored.sdmdataset
After creating a project in Reexpress two from the ${MODEL_FILE}, you can then attach these scored splits for further analysis.
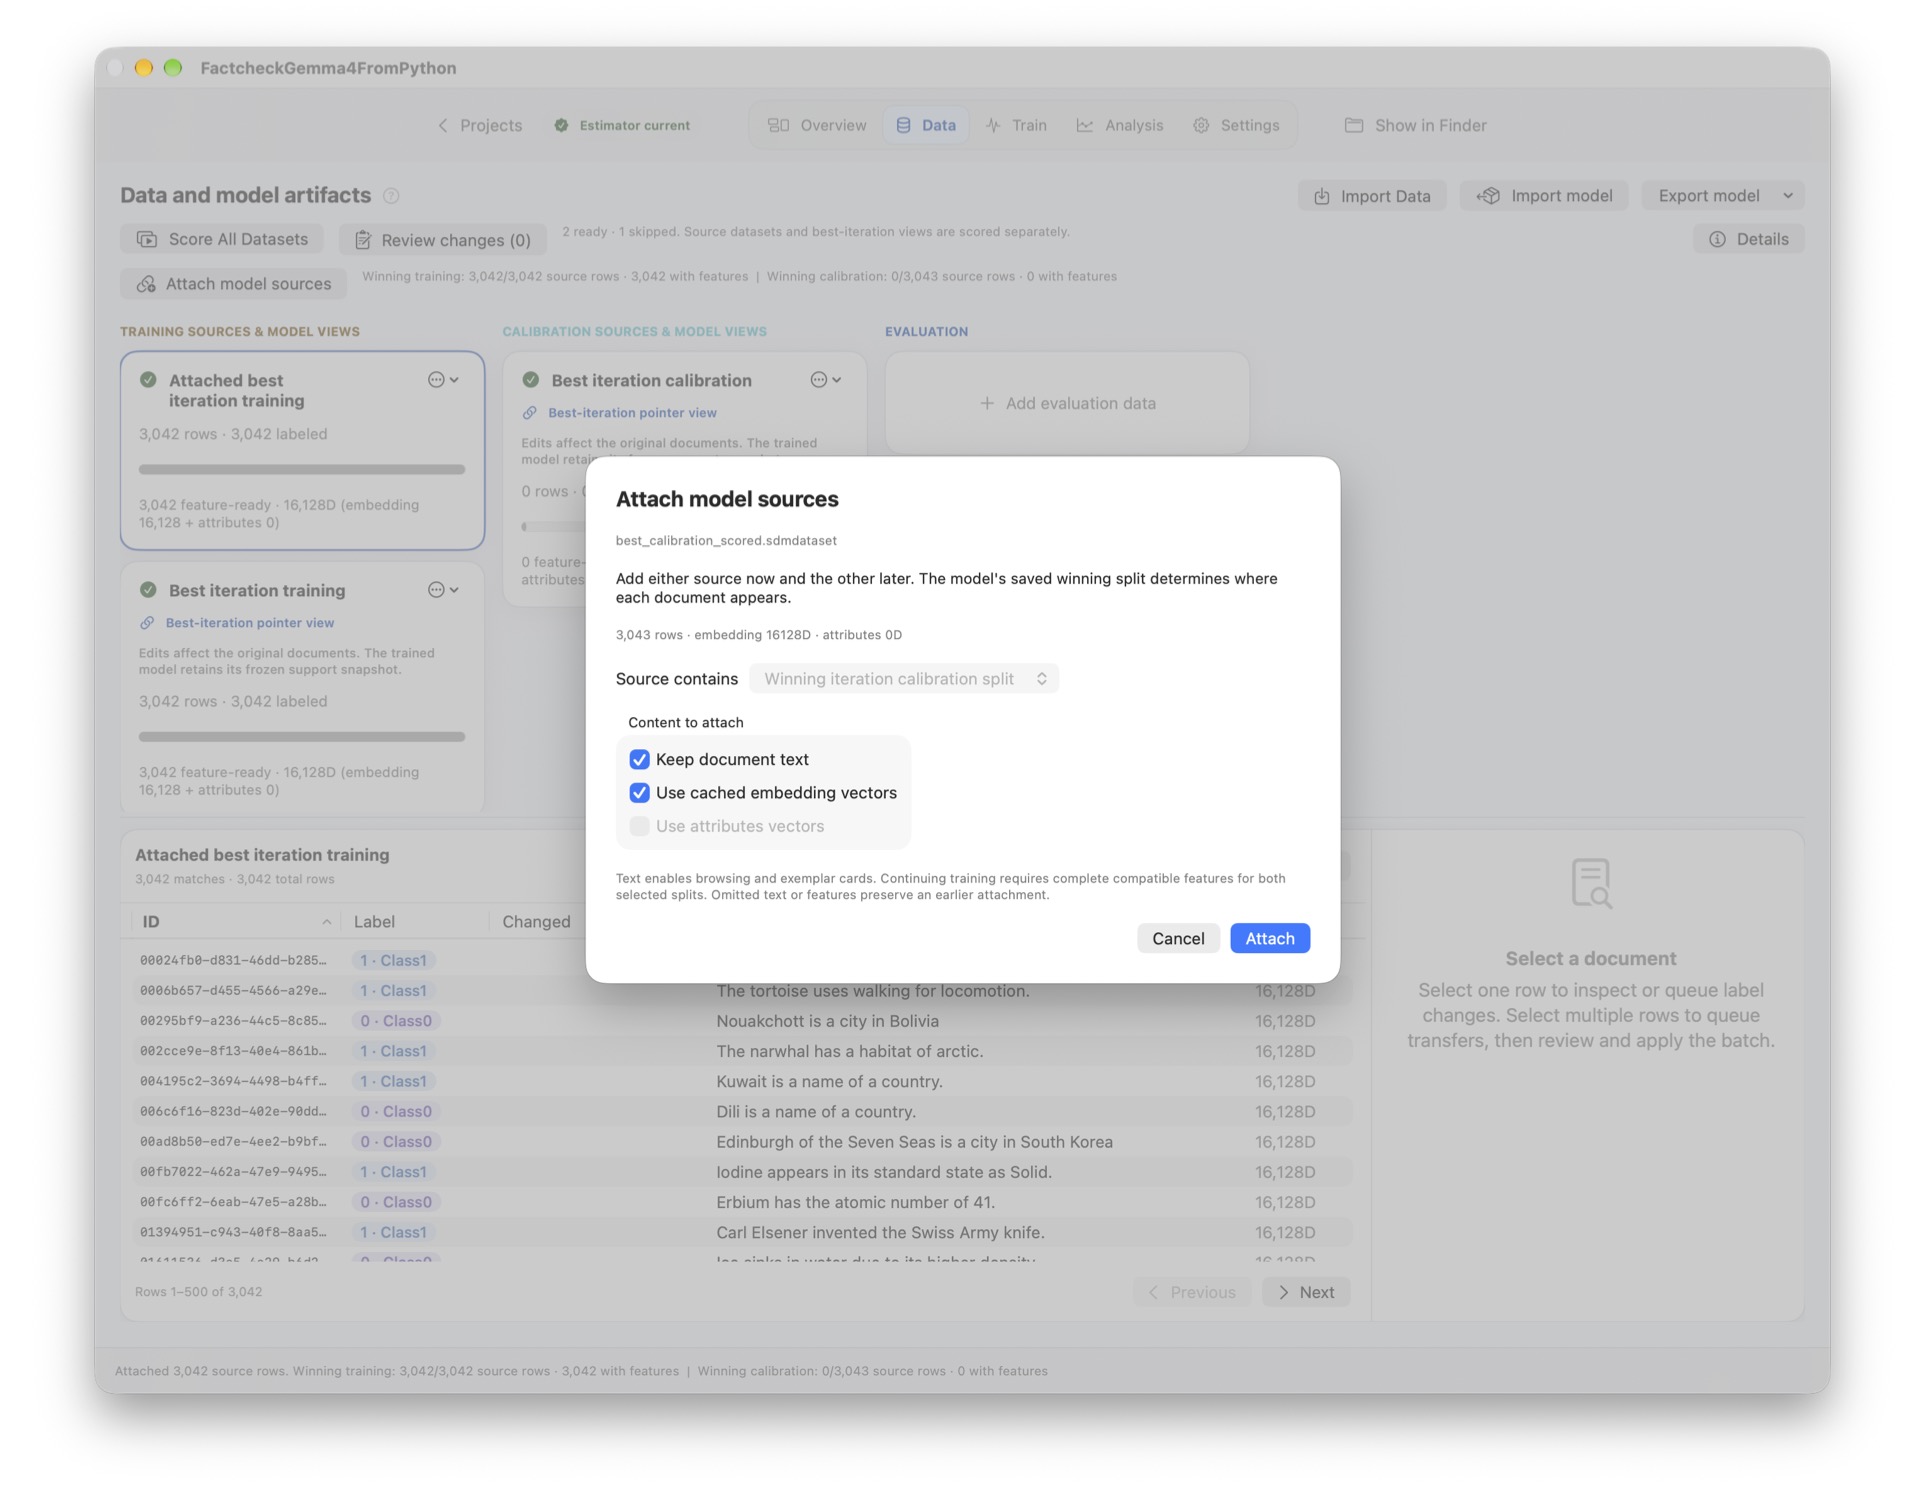
Go to the Data tab and choose "Attach model sources". For best_training_scored.sdmdataset the option "Source contains: Winning iteration training split" will be auto-selected. Click Attach.
Next, do the same for best_calibration_scored.sdmdataset, for which "Source contains: Winning iteration calibration split" will be auto-selected.
(Alternatively you can upload the original training and calibration splits and choose "Source contains: Original training split" and "Source contains: Original calibration split", but in that case, you will need to rescore the files in the app itself.)
Outside of Reexpress two, we can also then evaluate using sdm evaluate to produce a summary evaluation report for the documents that formed the calibration set in the chosen iteration of learning the parameters of the SDM activation:
sdm evaluate \
--model=${MODEL_FILE} \
--input=${EVAL_OUTPUT_DIR}/best_calibration_scored.sdmdataset \
--output ${EVAL_OUTPUT_DIR}/best_calibration_scored.overall_evaluation_report.json
Note that there is currently no equivalent option for constructing a summary evaluation report for the best iteration training set directly from the CLI, but this can be readily achieved with the Python API:
python - \
  "${MODEL_FILE}" \
  "${EVAL_OUTPUT_DIR}/best_training_scored.sdmdataset" \
  "${EVAL_OUTPUT_DIR}/best_training_scored.overall_evaluation_report.json" <<'PY'
import json
import sys
from pathlib import Path
from reexpress_sdm import Dataset, SDMController

model_path, input_path, output_path = sys.argv[1:]
controller = SDMController.load(model_path)
dataset = Dataset.load(
    input_path,
    expected_dimension=controller.model.embedding_dimension,
    number_of_classes=controller.model.number_of_classes,
    require_labels=True,
)
dataset.validate_class_names(controller.model.configuration["classNames"])

# Require the explicit exclusions saved by selected-training export.
identities = [row["excludedSupportIndex"] for row in dataset.rows]
if any(index is None for index in identities):
    raise ValueError("Every selected-training row must have a support exclusion")

scores = controller.score(
    dataset.vectors,
    ids=dataset.ids,
    representation_fingerprint=dataset.representation_fingerprint,
    identity_support_indices=identities,
)
report = {
    "evaluation": controller.evaluate(scores, dataset.labels),
    "distribution": controller.summarize_distribution(scores),
}
Path(output_path).write_text(
    json.dumps(report, indent=2, allow_nan=False) + "\n", encoding="utf-8"
)
PY
This recomputes scores with self-exclusions and writes the same evaluation and distribution report structure as the CLI. Missing exclusions cause an error.
Convert JSONL to .sdmdataset
The previous section demonstrated converting the best iteration training/calibration splits to .sdmdataset files. In that case, the .sdmdataset file included scores, but that format can also be used more generally in place of the .jsonl format as input to the CLI, as well as with Reexpress two, for any data split. The advantage of the .sdmdataset format (which is a simple directory package) over .jsonl files is that it is generally more compact and faster to read and import into Reexpress two, since the embedding/attributes field is no longer stored in JSON. The rows remain readable. You can inspect the contents directly:
% ls ${EVAL_OUTPUT_DIR}/best_calibration_scored.sdmdataset
embeddings.npy    manifest.json    rows.jsonl
At the same time, the raw .jsonl files have the advantage of more general portability, as the embedding/attributes are simply saved as a numeric array in JSON.
The following demonstrates how to convert the held-out test sets from above to the .sdmdataset format.
conda activate re_python_v1

PROJECT_DIR="/Users/a/Documents/project_tutorials"  # Update with the applicable path

DATA_DIR="${PROJECT_DIR}/data/factcheck_gemma_4_31b_it_4bit"

TASK_LABEL="factcheck"
MODEL_LABEL="gemma_4_31b_it_4bit"

for EVAL_LABEL in "ood_eval" "ood_eval.ood_random_shuffle"; do

EVAL_FILE="${DATA_DIR}/${EVAL_LABEL}.${MODEL_LABEL}.jsonl"

echo "Processing ${EVAL_FILE}"

sdm dataset convert --input "${EVAL_FILE}" --output "${DATA_DIR}/${EVAL_LABEL}.${MODEL_LABEL}.sdmdataset" \
  --representation_fingerprint embedding_v1

done
Aside: Note that .jsonl and .ndjson file extensions can be used interchangeably, but our convention is to always use .jsonl.
The corresponding .sdmdataset can be noticeably more compact. In the above, ood_eval.gemma_4_31b_it_4bit.jsonl is about 49 MB whereas ood_eval.gemma_4_31b_it_4bit.sdmdataset is about 16 MB.
Explore the results in Reexpress two
All of the above functionality can be achieved without touching the command line (or Python code) by creating a project from scratch in Reexpress two, importing the files, and running training, calibration, and scoring in the app. Alternatively, if you (or your AI agent) have already trained a model as above, you can directly import it into the app for analysis. The app makes it easy to visualize the data; to examine the nearest exemplars; and also to change labels and move documents across data splits. Here, we describe the steps to upload a model and data that was processed with the Python package.
First, open Reexpress two. Choose "Start from a model" and select the model file used above (factcheck.gemma_4_31b_it_4bit.sdmkitmodel). Save the project file (.sdmproject) to your Mac's local hard drive.
The project file is itself a package directory (.sdmproject) which includes a database. You can always export models out to .sdmkitmodel files, and data to .jsonl and .sdmdataset files, to continue working with the Python package (and vice-versa).
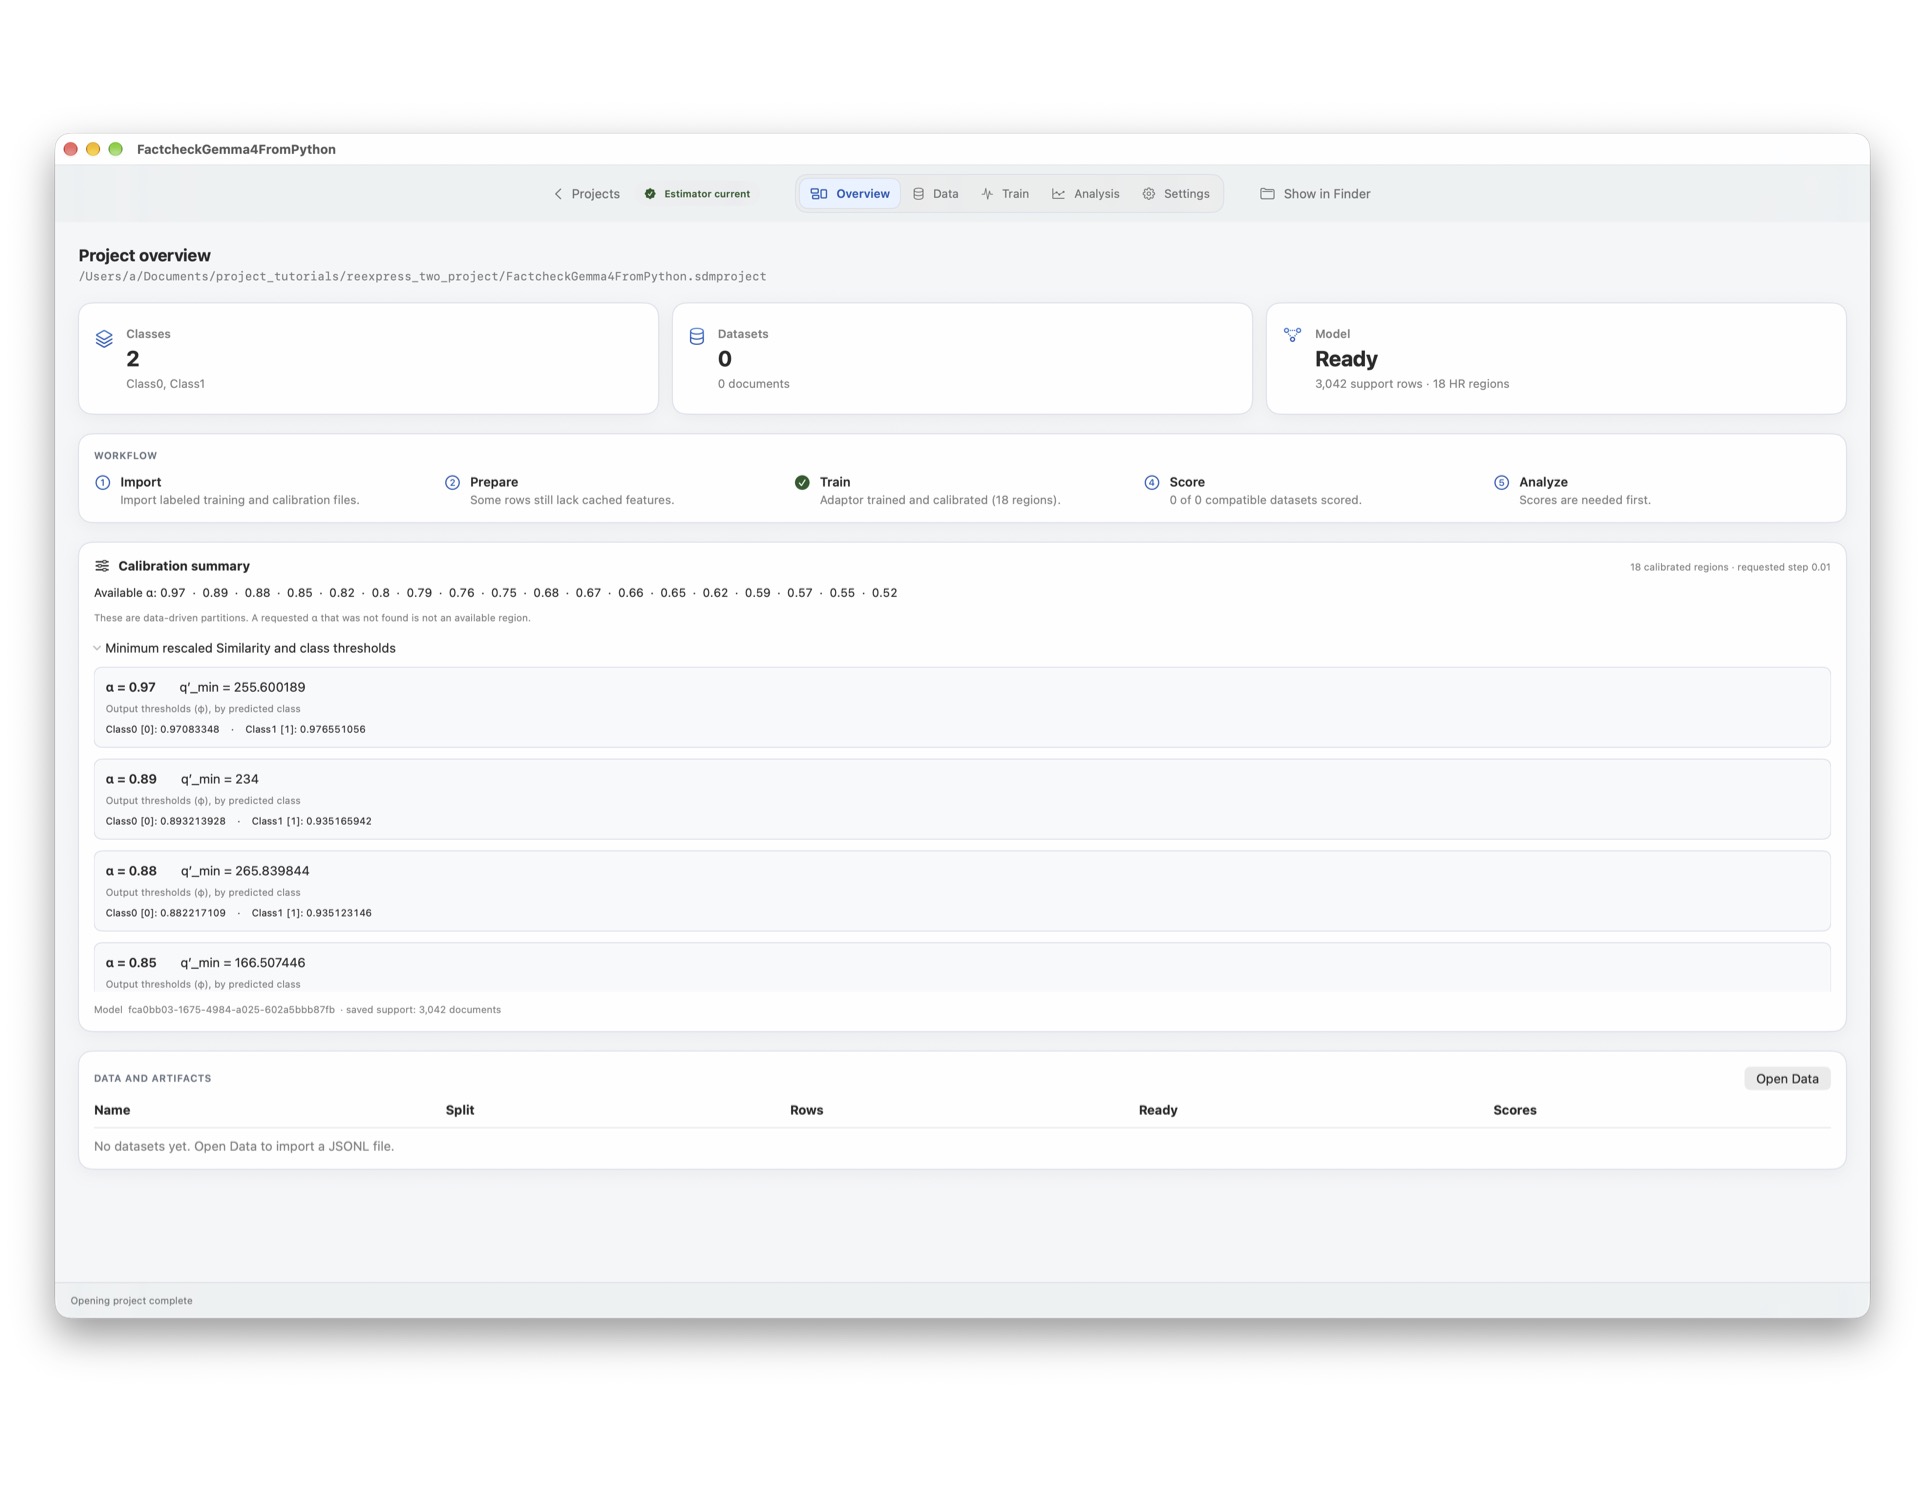
Once the project is created, in the Overview tab we can immediately see the summary of calibration, showing the alpha regions at 0.97, 0.89, 0.88, 0.85, 0.82, 0.8, 0.79, 0.76, 0.75, 0.68, 0.67, 0.66, 0.65, 0.62, 0.59, 0.57, 0.55, 0.52 and their associated Minimum rescaled Similarities and class thresholds.
Next, navigate to the Data tab. As noted in the section "Scoring the training and calibration sets", attach the scored splits for the best iteration training and calibration splits (i.e., best_calibration_scored.sdmdataset and best_training_scored.sdmdataset created by sdm dataset export-sources).
Next, we will also add our already-scored held-out test data. Still in the Data tab, click "Import data". First, select ood_eval.gemma_4_31b_it_4bit.per_document_scores.jsonl in the open file dialog box. For the dataset split, select "Evaluation". (In this case, the file doesn't have an "attributes" field, so keeping the default "Use attributes vectors when present" has no effect. If the file did have an "attributes" field, it would be necessary to uncheck "Use attributes vectors when present" since --composition="embedding" was used during training.)
Next, do the same for ood_eval.ood_random_shuffle.gemma_4_31b_it_4bit.per_document_scores.jsonl, again selecting "Evaluation" for the dataset split.
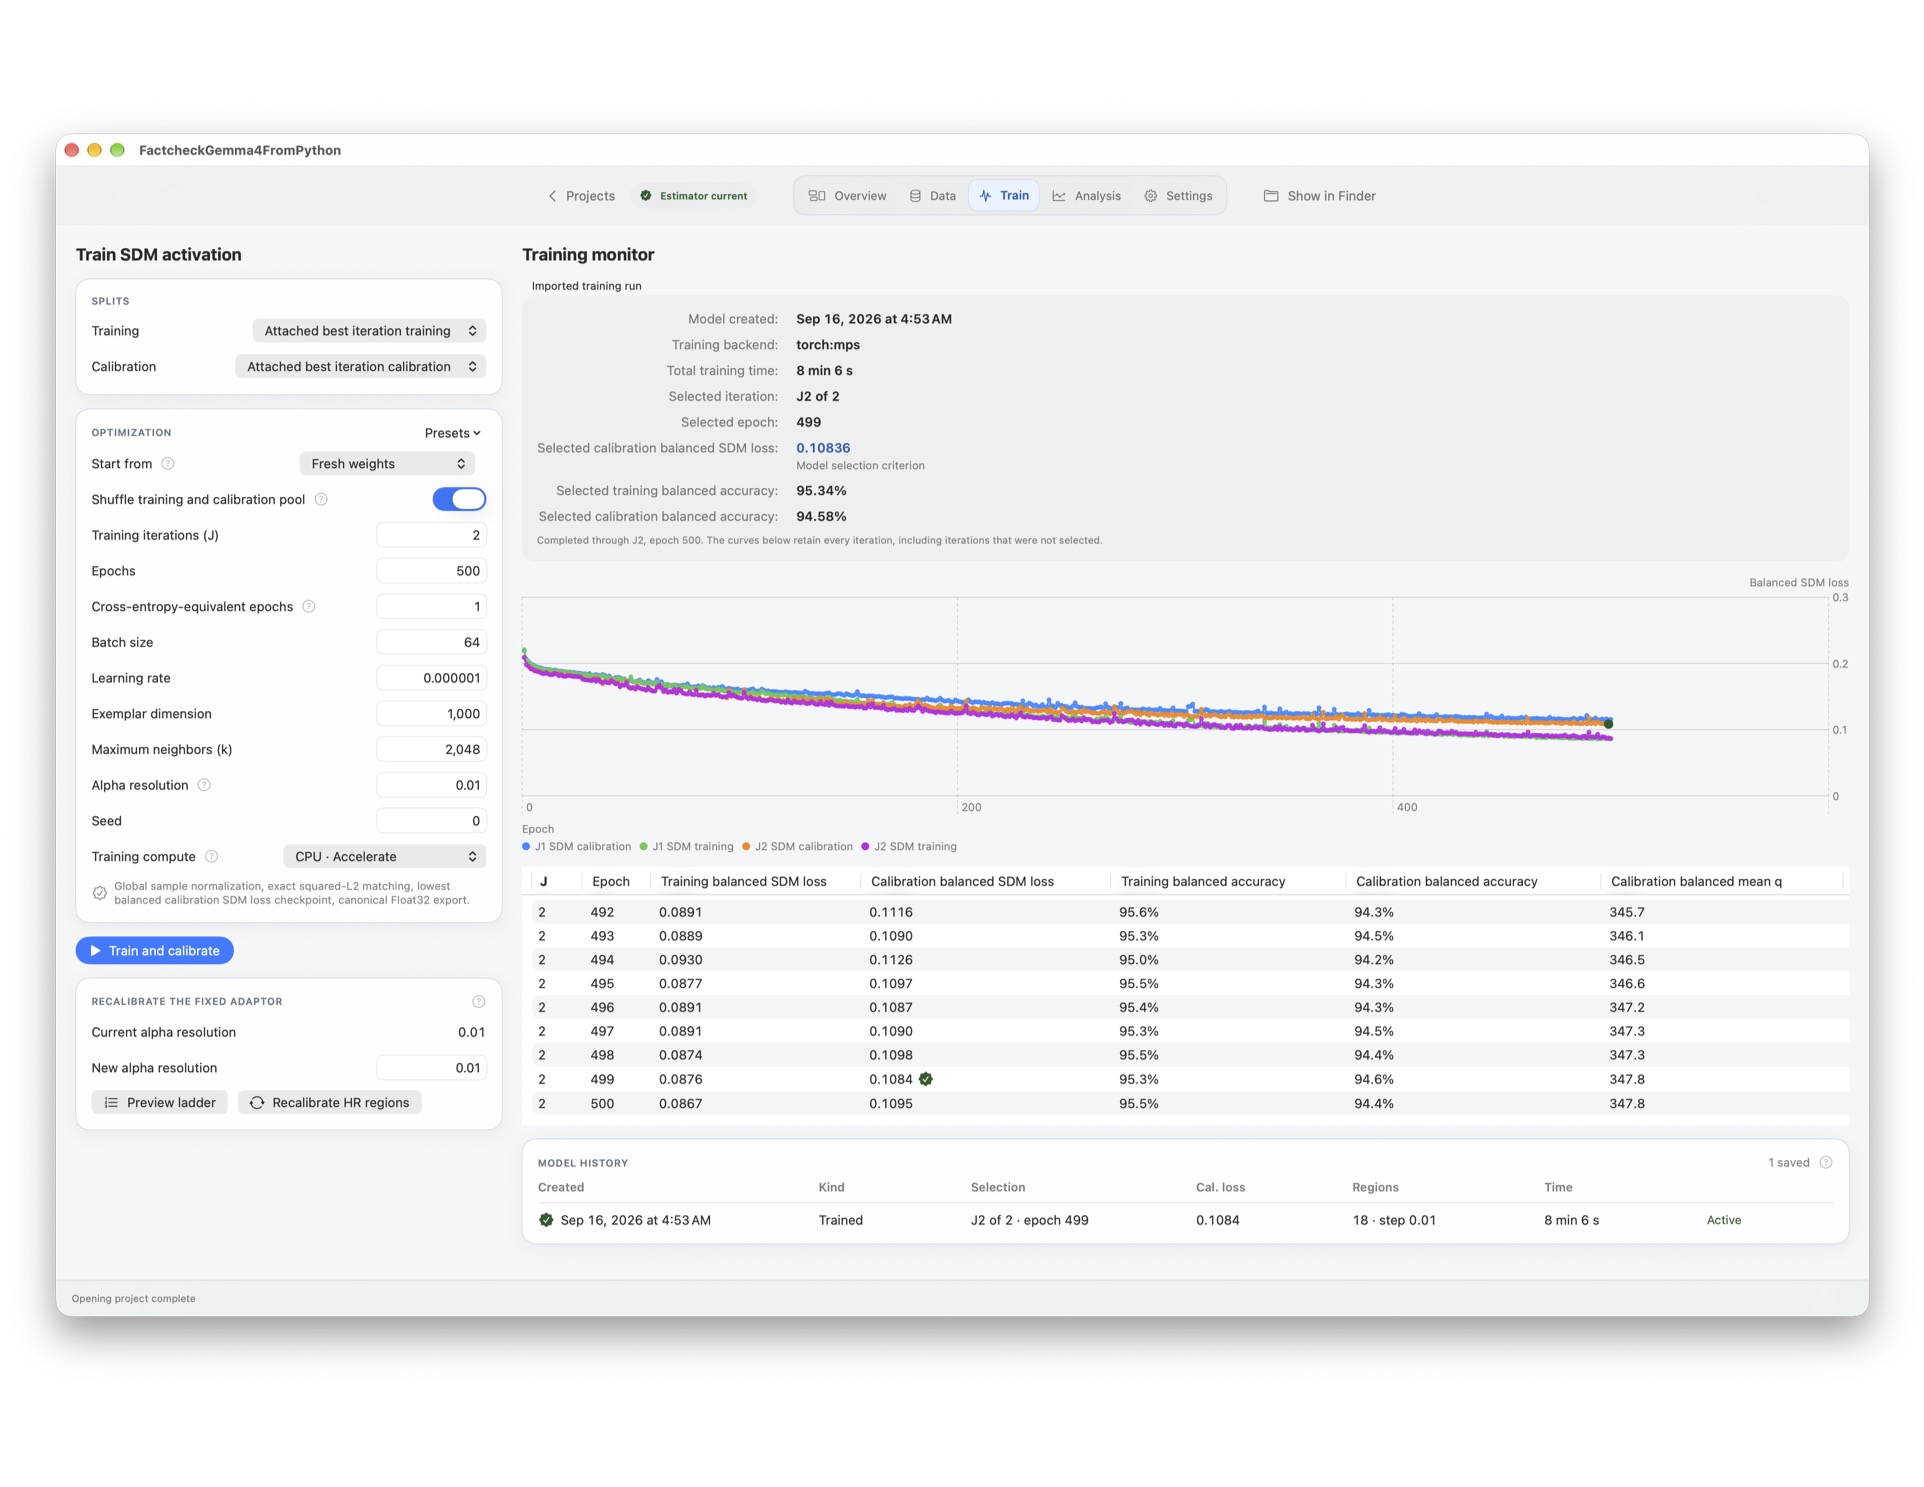
In the Train tab, we can view the training curves for both iterations. In this view, we can also start training again, or continue training from these weights. And we can always walk back to previous models by activating the weights in the "Model History" section at the bottom of the screen. (Note that when activating a new set of weights, it is necessary to rescore the documents.)
Next, go to the Analysis tab and select the ood_eval.gemma_4_31b_it_4bit.per_document_scores.jsonl split.
Your output may differ from ours (especially if you chose different training parameters), but in our run above, there was 1 point in the 0.97 region whose prediction did not match the ground-truth labels.
We can narrow to that subset by clicking "Select documents" in the upper left and choosing "HR subset: Minimum accepted alpha" and then choosing alpha>=0.97. (With SDM estimators, the High-Reliability (HR) region refers to the set of points for which the class- and prediction-conditional accuracy is estimated to be at least the given alpha value, which in this case is 0.97. Since alpha=0.97 is the most conservative region here, we could equivalently have selected "HR subset: Exactly one region" and then chosen alpha=0.97.)
Also select "Outcome: Incorrect only". Then either in Charts or Documents we can select the incorrect point. After clicking the point in Charts (or selecting the row in Documents), select Report.
The document's text is "JUBALAND is a state in South Sudan, located in Central Equatoria." for which the ground-truth label is 1 (which corresponds to "true statement" for this task). This is actually an annotation error; Jubaland is a federal member state of Somalia and not South Sudan.
The SDM estimator is relatively confident in this point with a Rescaled Similarity (q') of 760. The nearest match in the support set is "Juba is a city in Albania." That is correctly predicted as false; Juba is the capital of South Sudan and not a city in Albania.
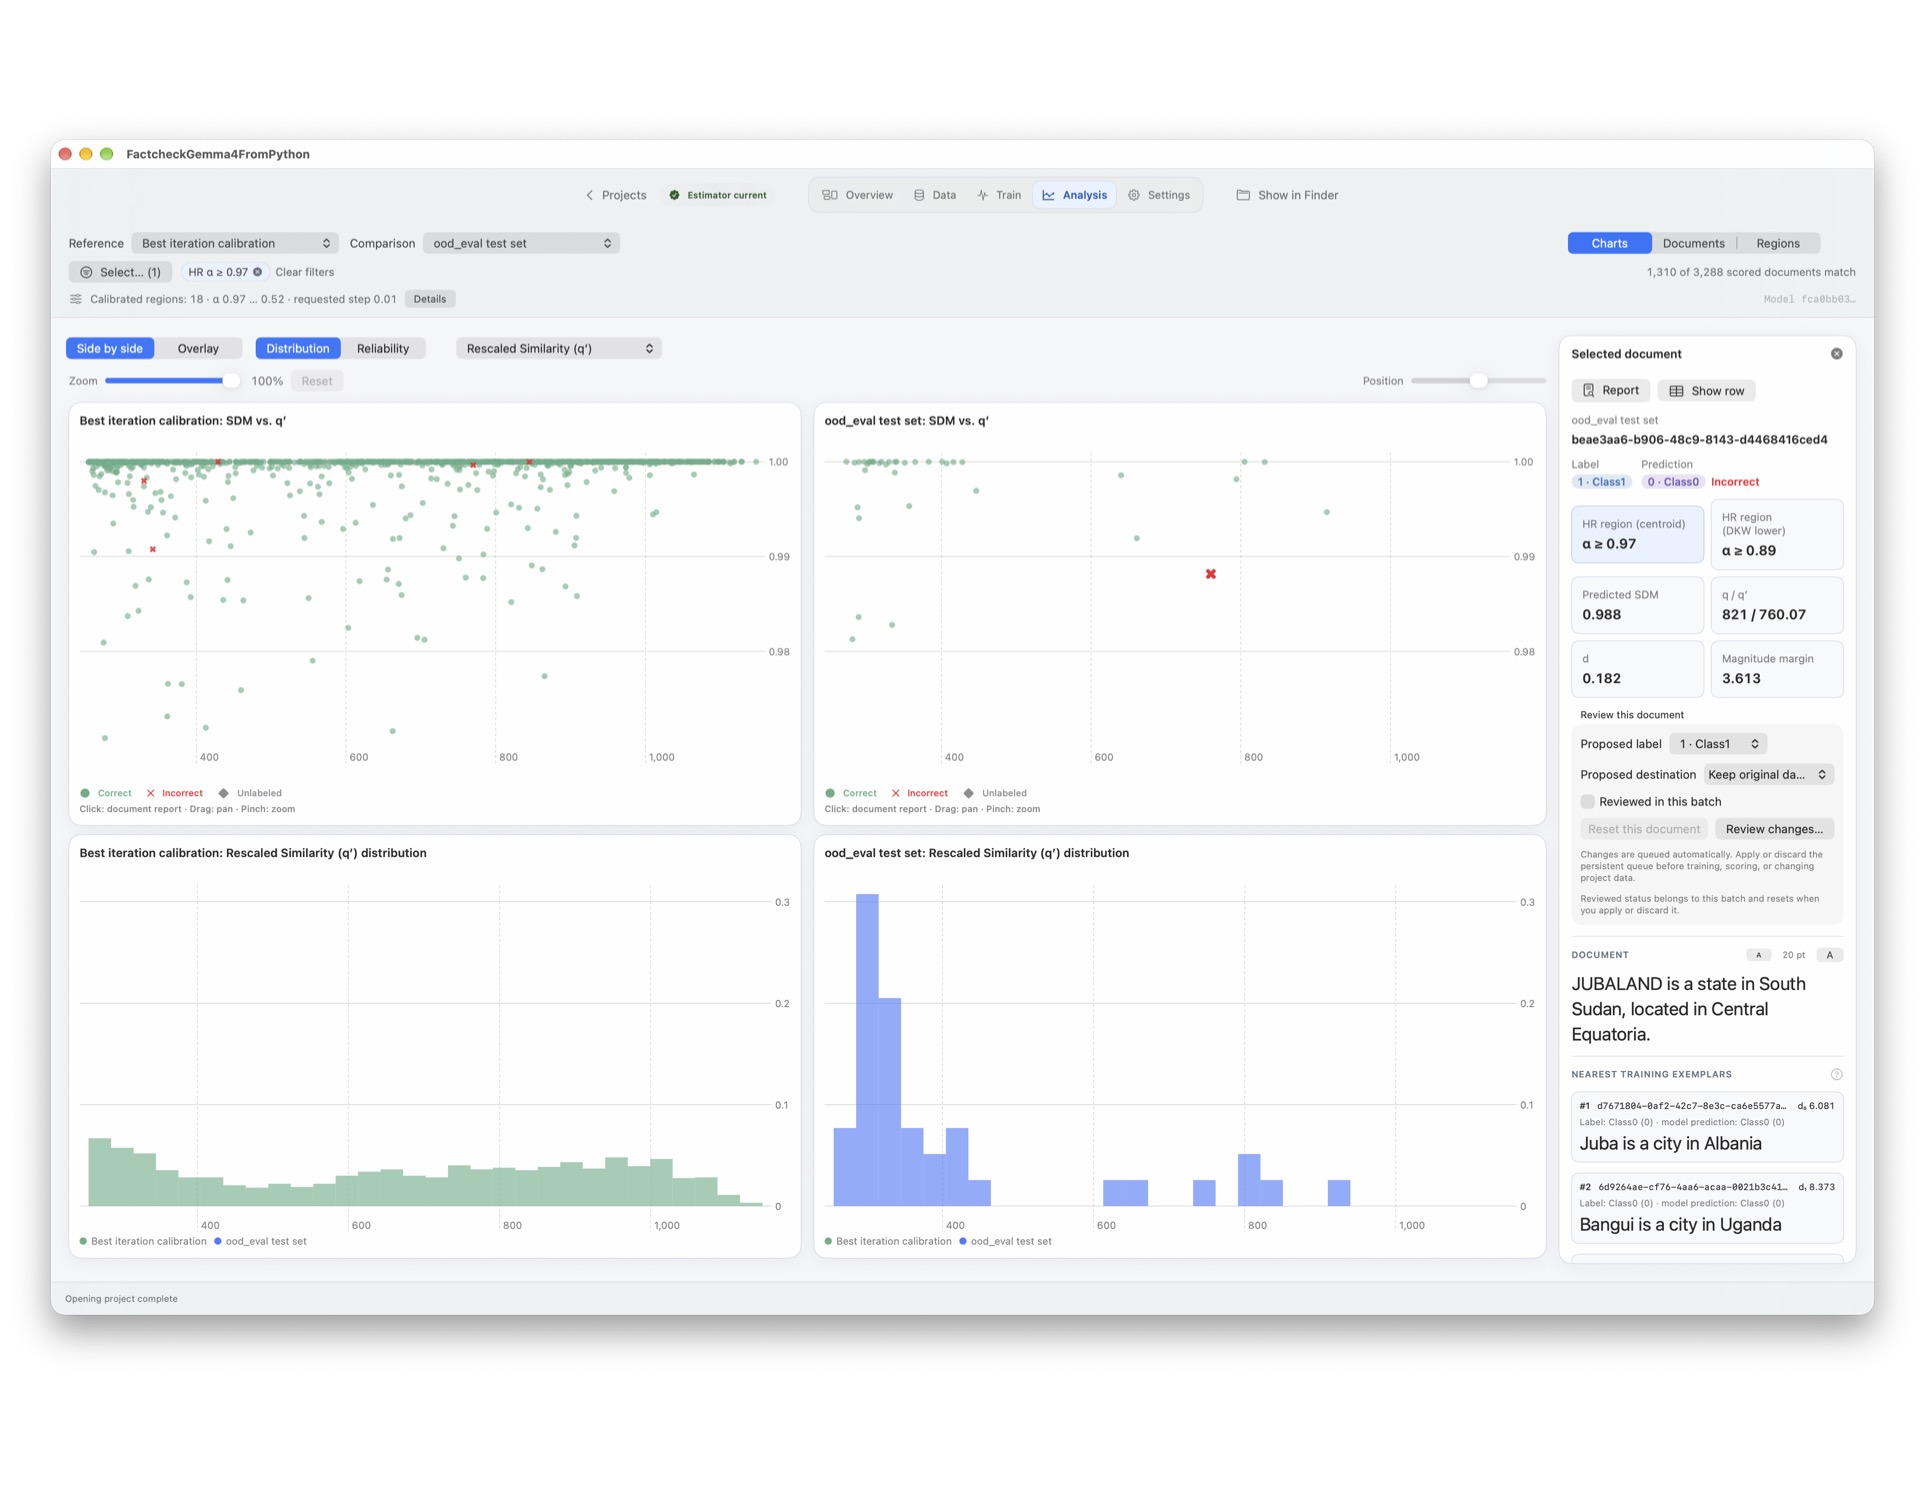
As one final thing to look at as an intro to the utility of Reexpress two (and SDM estimators, more generally), go back to Charts and examine the distribution of the out-of-distribution dataset ood_eval.ood_random_shuffle.gemma_4_31b_it_4bit with that of the calibration data. In addition to the HR regions, compare the distributions across the metric-learning signals of Similarity and Distance. The differences in the distributions are stark when controlling for these signals, but typical calibration methods marginalize over such information, which can silently result in over-confident predictions entering the decision-making pipeline. For this reason, when using neural networks, geometry-aware calibration methods like SDM estimators are critical.
Where to go next
In this tutorial, we have demonstrated the behavior of the reexpress_sdm package with a straightforward classification task, but more generally, you can use the reexpress_sdm package to guide and control complex, continual-learning multi-LM agent pipelines. And Reexpress two can be used to analyze and interpret those conditional-branching decisions, keeping you, the human user, meaningfully "in the loop".